Writing a Python Filter
0. Environment Setup
You will need to first setup your python environment. We will be using an Anaconda virtual environment for this tutorial.
conda config --add channels conda-forge
conda config --set channel_priority strict
conda create -n nxpython python=3.12
conda activate nxpython
conda install -c bluequartzsoftware dream3dnx
Or, if you are installing from a local conda-bld directory, it will be something like:
conda install -c file:///some/path/to/a/conda-build/folder dream3dnx
Wait until the environment is fully installed.
Attention
For those with older Anaconda installations that cannot update, you can install the ‘mamba’ package which is a drop in replacement for ‘conda’. Mamba is built as a native applicaiton with native application speeds. Mamba can dramatically improve the ‘solving the environment’ waiting game. Conda versions starting at 23.11.x use the underlying ‘libmamba’ and are therefor just as fast at solving an environment.
Next you will want to launch DREAM3D-NX from the same Anaconda command prompt.
MacOS
dream3dnx
Linux
DREAM3DNX
Windows
dream3dnx.exe
1. Generating the Skeleton Code
Generate Python Plugin and/or Python Filters is a filter in simplnx that generates the skeleton code for new Python filters.
This filter can generate skeleton code for the new filters in an existing Python plugin, or it can also generate the skeleton code for a new Python plugin.
Steps:
- Access the Filter:
Add the Generate Python Plugin and/or Python Filters filter to your pipeline.
- Configure the Filter:
- New Python Plugin
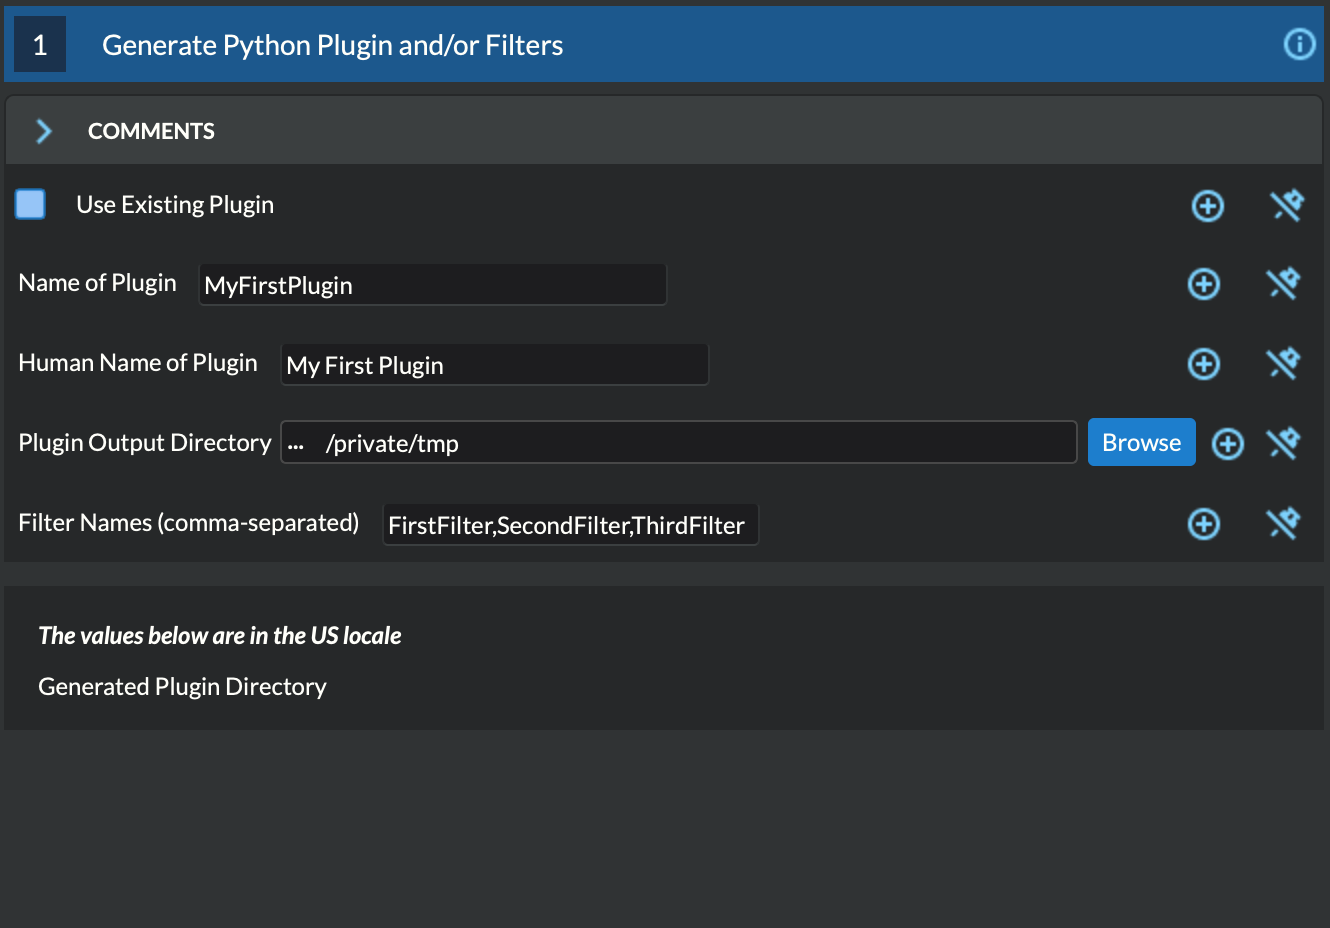
Turn OFF Use Existing Plugin.
Input the programmatic name and human name for the new plugin.
Select the output directory for the new plugin.
Set the desired programmatic names for your new filters (separated by commas).
- Existing Python Plugin
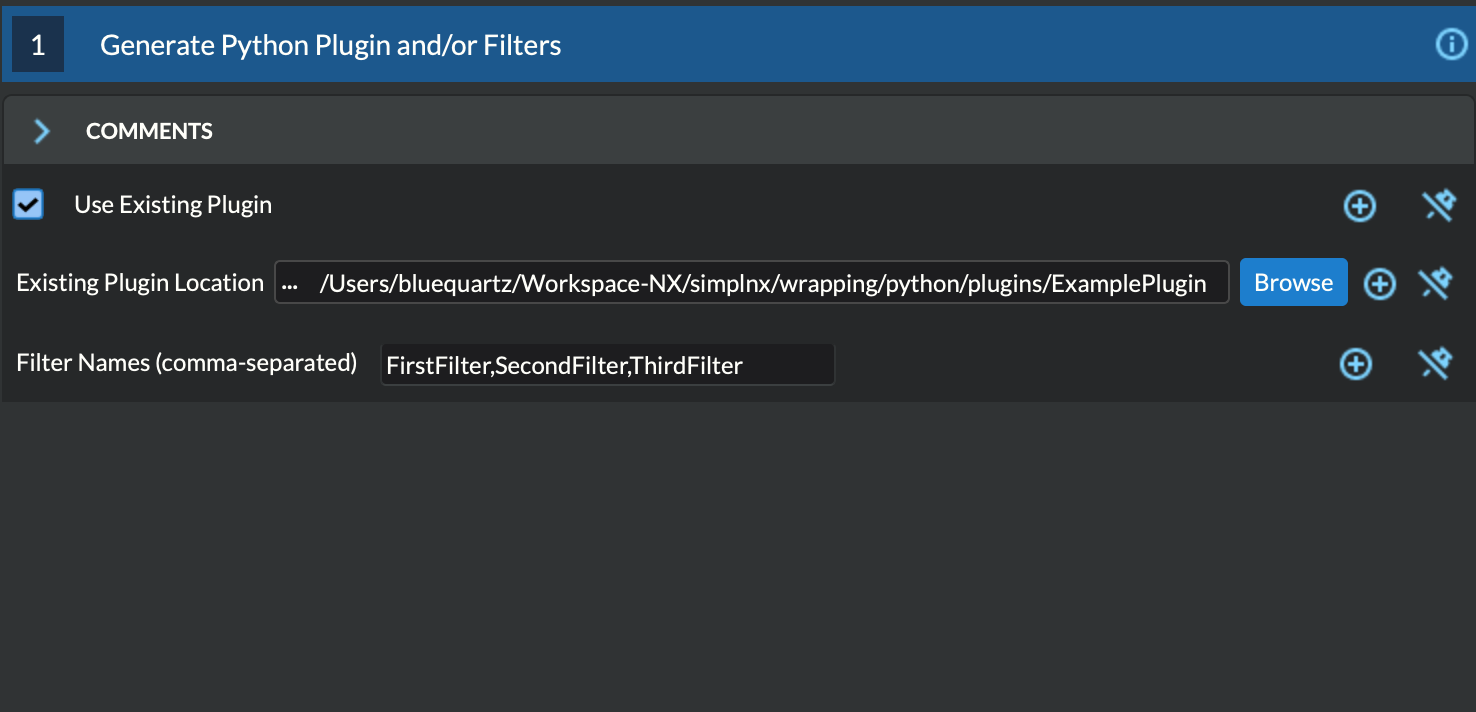
Turn ON Use Existing Plugin.
Select the existing plugin location on the file system (the top-level directory of the existing plugin).
Set the desired programmatic names for your new filters (separated by commas).
- Generate the Code:
- Run the filter.
If Use Existing Plugin is OFF, then the new plugin directory structure and new filters will be generated at the specified output directory.
If Use Existing Plugin is ON, then the new filters will be generated inside the existing plugin at the specified location.
2. Loading The New Plugin
After you have generated your Python plugin/filters, close the current instance of DREAM3D-NX. Now, from the same Anaconda command prompt as before:
Export/Set the PYTHONPATH environment variable and have that point to a folder that you will be saving your new plugin into or a folder that holds your currently in-development plugin. Set the SIMPLNX_PYTHON_PLUGINS environment variable to the name of your plugin. Multiple plugin names should be separated by commas.
MacOS/Linux
export PYTHONPATH=/path/to/plugin/parent/directory
export SIMPLNX_PYTHON_PLUGINS=[NAME_OF_PLUGIN]
Windows
set PYTHONPATH=/path/to/plugin/parent/directory
set SIMPLNX_PYTHON_PLUGINS=[NAME_OF_PLUGIN]
Re-launch DREAM3D-NX again.
MacOS
dream3dnx
Linux
DREAM3DNX
Windows
dream3dnx.exe
You should now see your new filters loaded in the DREAM3D-NX user interface. Search for your filter’s name in the Filter List to verify.
Worked Example
When you launch DREAM3D-NX and you create the skeleton plugin folder of code, let us use the file path of /Workspace/DREAM3D_Plugins for the ‘Plugin Output Directory.’ If this is the case, then you would do the following based on your operating system.
macOS and Linux
export PYTHONPATH=/Workspace/DREAM3D_Plugins
Windows
set PYTHONPATH=C:/Workspace/DREAM3D_Plugins
And then you would set/export the ‘SIMPLNX_PYTHON_PLUGINS’ environment variable to the name of the plugin that you just created. Let use use ‘MyFirstPlugin’ for the “Name of Plugin” in the filter. Then you would do the following based on your operating system:
macOS and Linux
export SIMPLNX_PYTHON_PLUGINS=MyFirstPlugin
Windows
set SIMPLNX_PYTHON_PLUGINS=MyFirstPlugin
3. Understanding the Plugin Structure
Python plugins in simplnx contain 2 main files (__init__.py and Plugin.py) and the filter files.
__init__.py: The plugin initialization module that determines which symbols are to be exported when from PLUGIN_NAME import * is used. Also includes a get_plugin method that returns an instance of the plugin (used during the process of discovering and loading Python plugins).
Plugin.py: The main plugin module that contains the plugin’s unique id, plugin name, plugin description, plugin’s vendor, and the list of filters available in the plugin.
Filter Files: The Python modules that contain the parameter setup, validation, and execution logic for each filter.
4. Understanding the Filter Skeleton Structure
The skeleton provides a basic structure with placeholders and conventions that align with simplnx’s architecture.
Components:
Filter Class: The main class that represents your filter.
class FirstFilter:
    # Filter class definition
Parameter Keys: Use descriptive constants to define keys for your parameters. These keys will be used to access parameter values from the args dictionary in preflight_impl and execute_impl.
The variable name should be in ALL_CAPS and end with ‘_KEY’
The value of the variable should be in ‘all_lower_snake_case’
"""
This section should contain the 'keys' that store each parameter. The value of the key should be snake_case. The name of the value should be ALL_CAPITOL_KEY
"""
TEST_PATH_KEY = 'test_path'
UUID Method: This method returns the unique identifier for the new filter. This unique identifier is automatically generated and should typically not be modified.
NOTE: If you are creating a new filter by copying the contents of an existing filter file (NOT generating a new filter), this unique identifier MUST be modified! For this case, you can simply call uuidgen from the command line and then copy the result into this method.
def uuid(self) -> nx.Uuid:
    """This returns the UUID of the filter. Each filter has a unique UUID value
    :return: The Filter's Uuid value
    :rtype: string
    """
    return nx.Uuid('caad34b3-54e3-4276-962e-b59cd88b7320')
Human Name Method: This method returns the human-readable name for the filter. This name is typically used in the DREAM3D-NX GUI. It is set, by default, to the programmatic name of the filter and should probably be modified to something more human-readable.
The value should be properly capitalized and spaced
def human_name(self) -> str:
    """This returns the name of the filter as a user of DREAM3DNX would see it
    :return: The filter's human name
    :rtype: string
    """
    return 'My First Filter'    # This could be updated to return 'First Filter' or '1st Filter', or any other human-readable name.
Class Name Method: This method returns the programmatic name for the filter.
The value should use the ‘CamelCase’ style with NO SPACES
def class_name(self) -> str:
    """The returns the name of the class that implements the filter
    :return: The name of the implementation class
    :rtype: string
    """
    return 'FirstFilter'
Name Method: This method returns a generic name for the filter.
The value should use the ‘CamelCase’ style with NO SPACES
def name(self) -> str:
    """The returns the name of filter
    :return: The name of the filter
    :rtype: string
    """
    return 'FirstFilter'
Default Tags Method: This method returns all the tags that are used to match this filter when searching. For example if this filter has the tag Foo, then any time Foo is searched in the Filter List, this filter will match and appear in the search results. The default tag for Python filters is python, but feel free to add more if needed.
def default_tags(self) -> List[str]:
    """This returns the default tags for this filter
    :return: The default tags for the filter
    :rtype: list
    """
    return ['python', 'IO', 'Some Algorithm']
Clone Method: This method returns a new instance of the filter. This method should not be modified.
def clone(self):
    """Clones the filter
    :return: A new instance of the filter
    :rtype:  FirstFilter
    """
    return FirstFilter()
Parameters Method: This method defines the parameters that a user of your filter would see in the user interface or have access to if using your filter from another instance of python.
def parameters(self) -> nx.Parameters:
    params = nx.Parameters()

    # Add your parameters here

    return params
Preflight and Execute Methods: These are crucial methods where your filter’s logic will reside. The preflight_impl() is called every time an input parameter is modified in the user interface therefor the preflight_impl should run as fast as possible. The execute_impl() method is where the actual work that your filter performs is kept.
def preflight_impl(self, data_structure: nx.DataStructure, args: dict, message_handler: nx.IFilter.MessageHandler, should_cancel: nx.AtomicBoolProxy) -> nx.IFilter.PreflightResult:
    # Preflight logic

def execute_impl(self, data_structure: nx.DataStructure, args: dict, message_handler: nx.IFilter.MessageHandler, should_cancel: nx.AtomicBoolProxy) -> nx.IFilter.ExecuteResult:
    # Execution logic
1. Defining Parameters
Parameters determine what inputs are available to users; they make your filter configurable and adaptable to different datasets and scenarios.
- Define Parameter Keys:
Use descriptive constants to define keys for your parameters. These keys will be used to access parameter values from the args dictionary in preflight_impl and execute_impl.
OUTPUT_ARRAY_PATH = 'output_array_path_key'
INIT_VALUE_KEY = 'init_value_key'
NUM_TUPLES_KEY = 'num_tuples_key'
NUM_COMPS_KEY = 'num_comps_key'
- Implement the `parameters` Method:
Create instances of parameter classes provided by simplnx and add them to your filter.
def parameters(self):
    params = nx.Parameters()

    # Create a 'Number of Tuples' input, where the filter's user can input an unsigned 64-bit integer
    params.insert(nx.UInt64Parameter(FirstFilter.NUM_TUPLES_KEY, 'Number of Tuples', 'Number of Tuples', 1))

    # Create a 'Number of Components' input, where the filter's user can input an unsigned 64-bit integer
    params.insert(nx.UInt64Parameter(FirstFilter.NUM_COMPS_KEY, 'Number of Components', 'Number of Components', 1))

    # Create an 'Initialization Value' input, where the filter's user can input the value that will be used to initialize the output array
    params.insert(nx.Float32Parameter(FirstFilter.INIT_VALUE_KEY, 'Initialization Value', 'This value will be used to fill the new array', '0.0'))

    # Create the input that allows the filter's user to pick the path where the output array will be stored in the data structure
    default_output_data_path = nx.DataPath(["Small IN100", "Scan Data", "Output"])
    params.insert(nx.ArrayCreationParameter(FirstFilter.OUTPUT_ARRAY_PATH, 'Array Creation', 'Example array creation help text', default_output_data_path))

    return params
For the full list of parameters and their arguments, please see SIMPLNX Filter Writer API Section.
To see examples of how to instantiate each parameter, check out ExampleFilter1 and ExampleFilter2.
6. Writing the Preflight Implementation
The preflight_impl method allows you to perform checks, validations, and setup tasks before the filter’s main execution. There are a number of basic steps that are performed but each step could have any number of details associated to it. The Preflight method should not be I/O or calculation intensive as it will be run every time a parameter in this filter or any other filter is modified.
Extract the input parameters values into local variables.
Test those values for any non-allowed values, ranges or other conditions
Use ‘Actions’ to modify the DataStructure as needed. These can be Array or Geometry creation or deletion.
Each Parameter will do some basic kinds of sanity checks before the code execution ever makes it to your filter’s ‘preflight’ method. For instance, ‘File Input’ parameters will already ensure that the file exists on the file system so the developer does not need to redo this kind of validation. DataArray/GeometrySelection types of parameters will ensure that the DataStructure DataPath already exists as another example. The filter parameter section will review the kinds of checks that each parameter perform
- Example Preflight Method:
This example creates a new 32-bit float output array using the number of tuples, number of components, and output array path provided by the user. It also validates that the initialization value is not set to 0.
def preflight_impl(self, data_structure: nx.DataStructure, args: dict, message_handler: nx.IFilter.MessageHandler, should_cancel: nx.AtomicBoolProxy) -> nx.IFilter.PreflightResult:
    # Retrieve the filter parameter values from the args dictionary using the filter's parameter keys
    num_of_tuples: int = args[FirstFilter.NUM_TUPLES_KEY]
    num_of_components: int = args[FirstFilter.NUM_COMPS_KEY]
    init_value: float = args[FirstFilter.INIT_VALUE_KEY]
    output_array_path: nx.DataPath = args[FirstFilter.OUTPUT_ARRAY_PATH]

    # Return a preflight error if the init value is 0
    if init_value == '0.0':
        return nx.IFilter.PreflightResult(errors=[nx.Error(-123, 'Init Value cannot be 0.')])

    # Create the new output array.  This is done via a CreateArrayAction, which we will create and then append to the output actions.
    # This will create the new output array and add it to the data structure so that it can be used later in the "execute_impl" method.
    output_actions = nx.OutputActions()
    output_actions.append_action(nx.CreateArrayAction(nx.DataType.float32, [num_of_tuples], [num_of_components], output_array_path))

    # Return the output actions
    return nx.IFilter.PreflightResult(output_actions)
Examples of the Major Steps:
- Parameter Retrieval and Validation:
Extract and validate the parameters to ensure they meet your filter’s requirements.
init_value: float = args[FirstFilter.INIT_VALUE_KEY]
if init_value == '0.0':
    return nx.IFilter.PreflightResult(errors=[nx.Error(-123, 'Init Value cannot be 0.')])
- Output Actions Setup:
If your filter creates new data arrays, create and add the CreateArrayActions to the output_actions object.
output_actions = nx.OutputActions()
output_actions.append_action(nx.CreateArrayAction(nx.DataType.float32, [num_of_tuples], [num_of_components], output_array_path))
8. Writing the Execute Implementation
The execute_impl method holds the core functionality of the filter. This function is generally where the actual calculations are performed.
- Example Execute Method:
This example sets the initialization value provided by the user into every index of the newly created output array.
def execute_impl(self, data_structure: nx.DataStructure, args: dict, message_handler: nx.IFilter.MessageHandler, should_cancel: nx.AtomicBoolProxy) -> nx.IFilter.ExecuteResult:
    # Retrieve the needed filter parameter values from the args dictionary using the filter's parameter keys
    init_value: float = args[FirstFilter.INIT_VALUE_KEY]
    output_array_path: nx.DataPath = args[FirstFilter.OUTPUT_ARRAY_PATH]

    # Get a reference to the output data array from the data structure
    output_data_array: nx.IDataArray = data_structure[output_array_path]

    # Get a numpy view of the output data array
    data = data_array.npview()

    # Set the init value into every index of the array
    data[:] = init_value

    return nx.Result()
Key Aspects:
- Parameter Retrieval:
Extract the necessary parameters from the args dictionary.
# Retrieve the needed filter parameter values from the args dictionary using the filter's parameter keys
init_value: float = args[FirstFilter.INIT_VALUE_KEY]
output_array_path: nx.DataPath = args[FirstFilter.OUTPUT_ARRAY_PATH]
- Access Data Arrays/Objects from the Data Structure:
Use DataPaths to get a reference to data arrays and other data objects from the data structure.
 # Get a reference to the output data array from the data structure
output_data_array: nx.IDataArray = data_structure[output_array_path]
- Manipulating Data Arrays With Numpy:
Get a numpy view into data arrays and then set values into the arrays using numpy. This gives a view of the data, NOT A COPY. Anything you have numpy do that is done “in place” will directly write those values into the stored DataArray.
# Get a numpy view of the output data array
data = data_array.npview()

# Set the init value into every index of the array
data[:] = init_value
9. Providing Feedback to the user during execution.
Both the preflight_impl and execute_impl have a ‘message_handler’ variable that is available for use to send back progress or other information to the user interface. The use of the message_handler should be tempered to only send back useful information. Sending ever iteration inside a tight loop will slow down your filter.
# use the 'message_handler' to send back progress or information updates
message_handler(nx.IFilter.Message(nx.IFilter.Message.Type.Info, f'Calculating Histogram Counts and Bin Bounds...'))
For more Python filter examples, check out the ExamplePlugin.
10. Debugging the Python Filter.
Running the python filter through the DREAM3D-NX user interface will not allow you any opportunity to use a debugger to inspect troublesome code. For this you will need to implement a separate python file that dynamically loads the python based plugin and then executes your filter with the proper arguments. The below code is the bare minimum that you will need to implement.
from typing import List
import simplnx as nx

# ------------------------------------------------------------------------------
# Replace NAME_OF_YOUR_PLUGIN with the actual name of your plugin
# Replace FILTER_NAME with the name of your filter that you would like to debug

import NAME_OF_YOUR_PLUGIN
nx.load_python_plugin(NAME_OF_YOUR_PLUGIN)
import NAME_OF_YOUR_PLUGIN.FILTER_NAME

# Create a Data Structure
data_structure = nx.DataStructure()
# Wrap the python filter in this "proxy" class from the target plugin so we can use it.
pynx_filter = nx.PyFilter(NAME_OF_YOUR_PLUGIN.FILTER_NAME())
# Execute the filter and check the result. We use the `execute2()` method to run the filter.
# Make sure to use all appropriate arguments to your filter. The named arguments are the values
# of each of the parameter keys that are defined at the top of the filter. For instance if you
# have this line:
#   INPUT_IMAGE_ARRAY_KEY = 'input_image_array'
# then you would use 'input_image_array' as the named argument in the call to `execute2()` method
result = pynx_filter.execute2(data_structure=data_structure,
                               ..... )